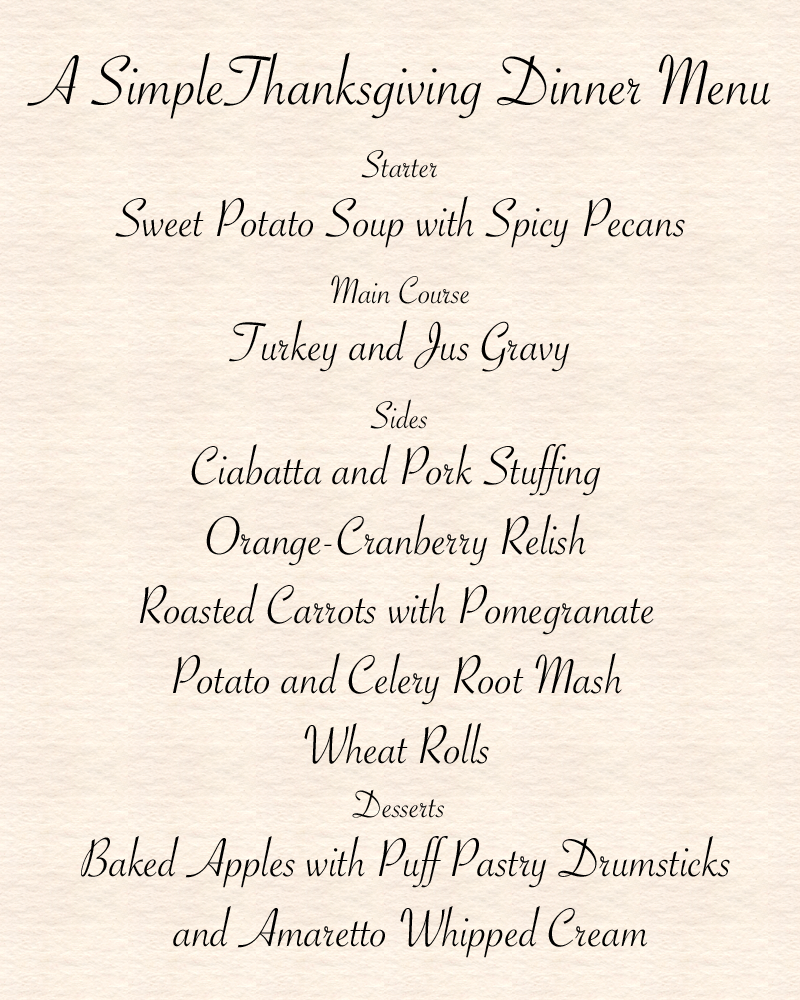
A Simple Thanksgiving Dinner Menu
Thanksgiving is a simple holiday: Gather – Eat – Give Thanks. There are no gifts to give out except, perhaps, for the small gift of a little help in the kitchen so that the Thanksgiving dinner can arrive to the table in good time and without any added holiday drama. Maybe even a few dishes get washed before the meal so the host is not burdened too heavily after all the fanfare is done.
To help you in the kitchen, we’re pleased to present a Thanksgiving menu complete with everything from Thanksgiving recipes and how-to videos to recommended wine pairings and table setting suggestions. A shopping list and a meal creation plan are also here to make your holiday planning just a little easier. The whole plan can be printed, made into a PDF or emailed by clicking the print button at the end of the post. Our meal plan is for a party of 6-8, but the recipes are simple and easily scalable. There should be plenty left for leftovers.
Of course, recipes can be even simpler. In each section, a few ways to cheat and make it even easier will be given. The food will be every bit as good if a few non-homemade items are used. It just helps ensure that there is more time for gathering, eating and giving thanks!
We hope you find this of use and, whether you use all, a part or none of this plan, we wish You and Your Family and Friends the Happiest of Thanksgivings!
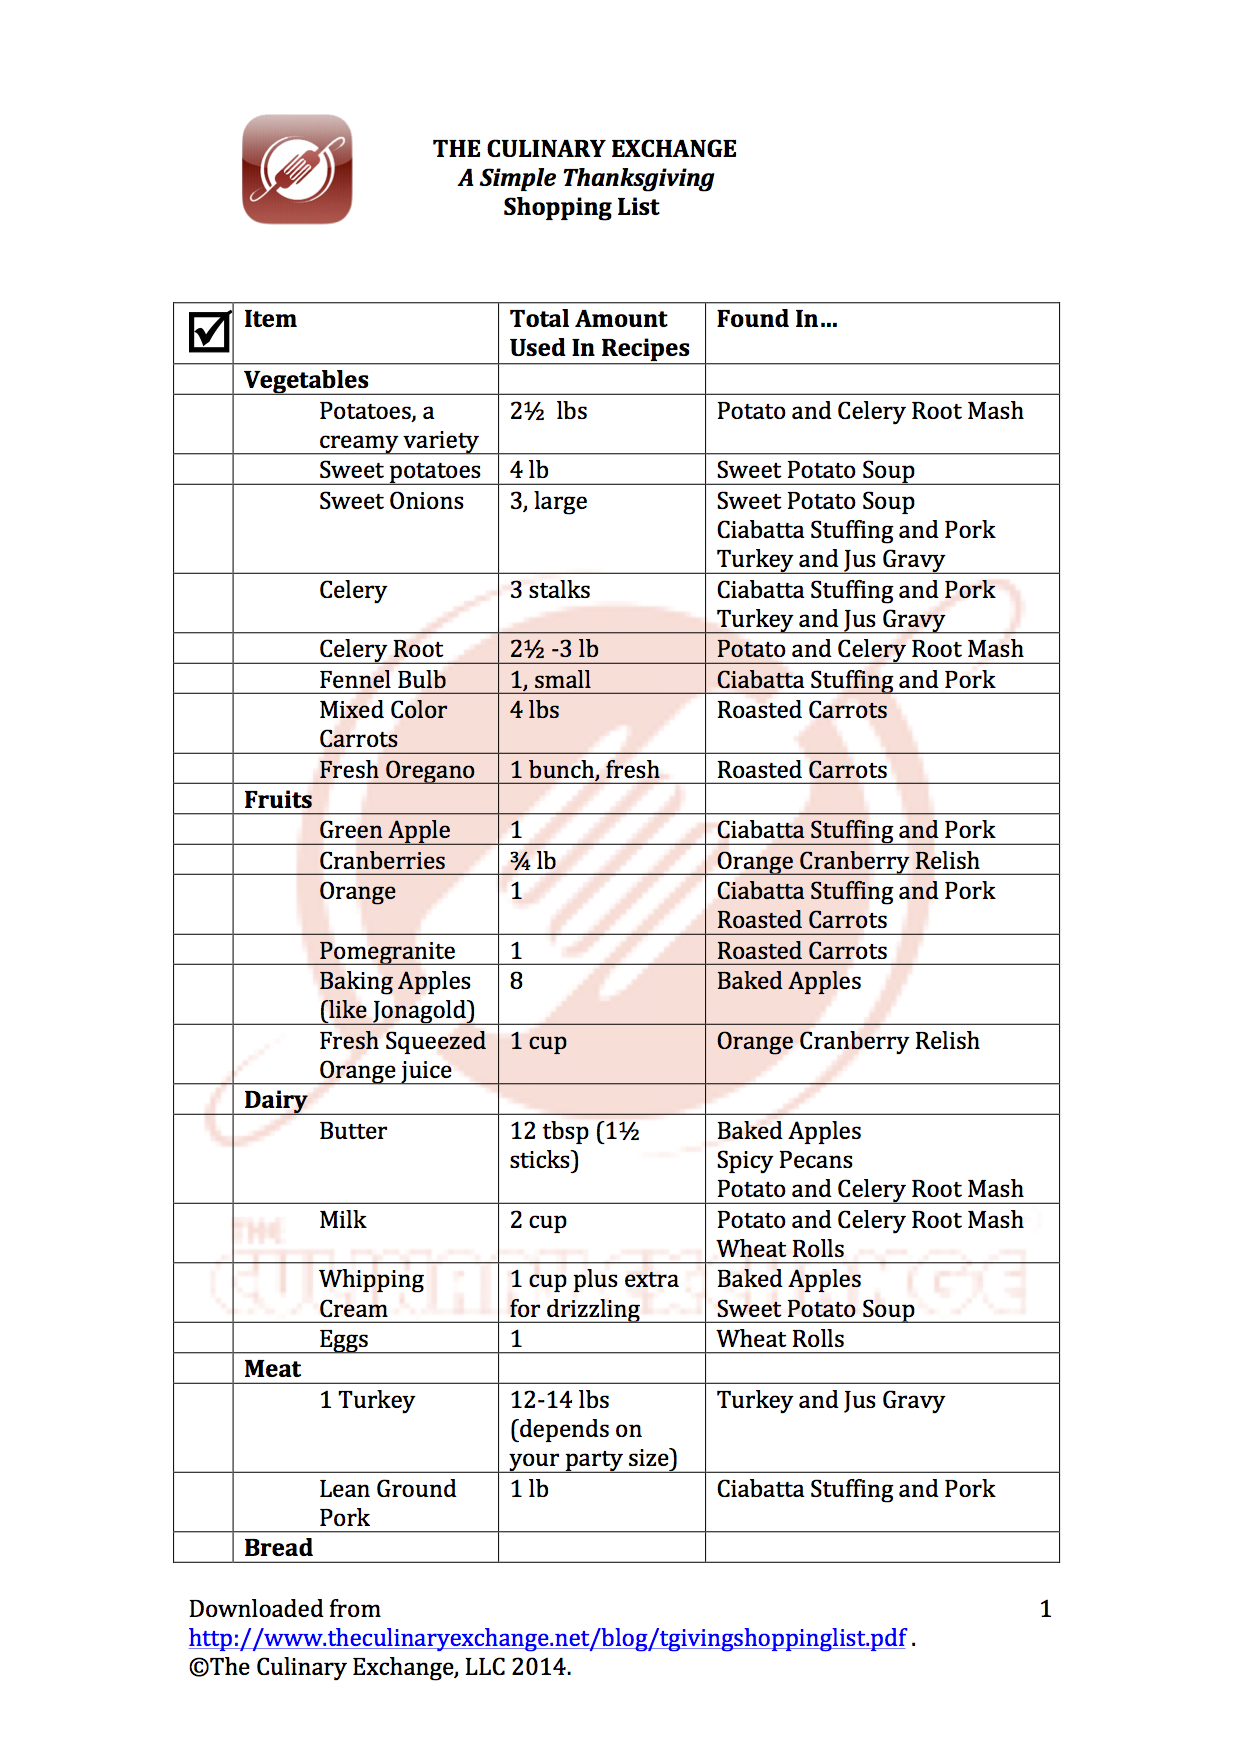
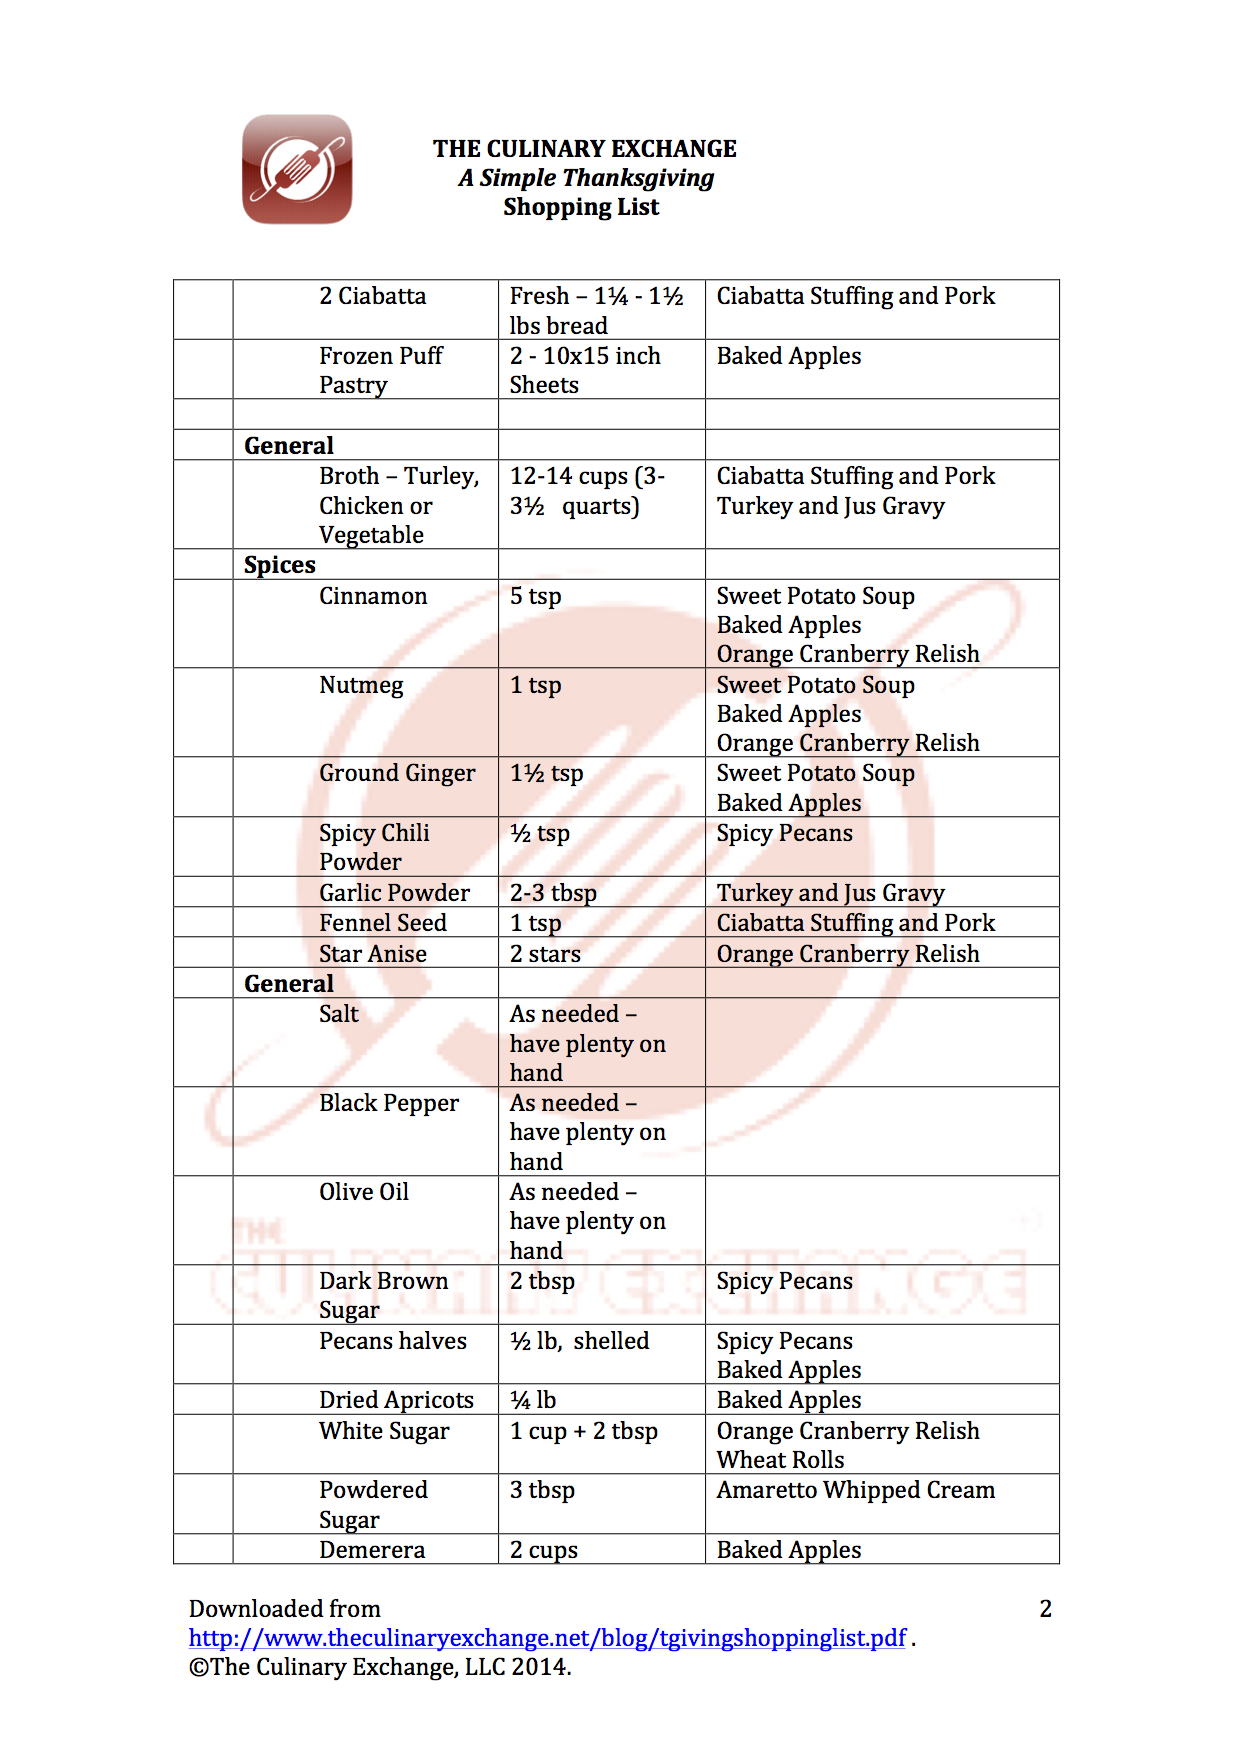
A Simple Thanksgiving Dinner Menu Shopping List
Our helpful Thanksgiving shopping list is presented here for your reading pleasure. The shopping list contains each item, how much is needed for all the recipes combined, and what recipes they are used in. It is also available in downloadable PDF format here.
A Simple Thanksgiving – Shopping List

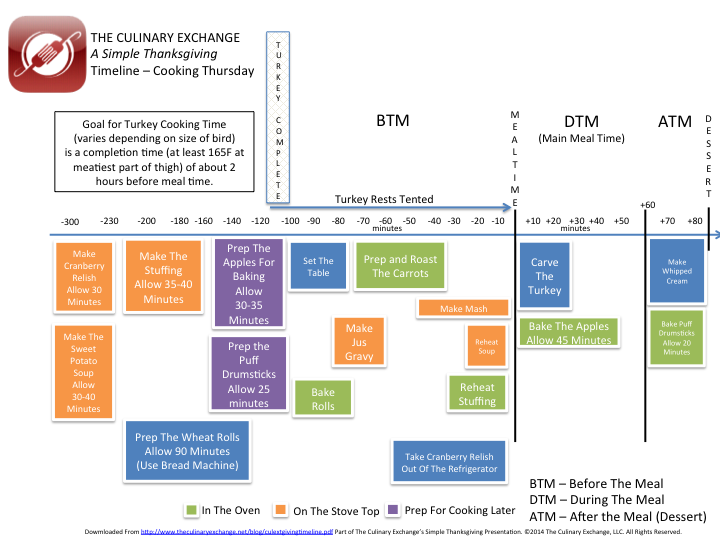
A Simple Thanksgiving Time Line – Cooking On Thursday
Most recipes can be made in advance for simplicity, but this timeline assumes that they will be made the day of. Additionally, this timeline details what items should be cooked on the stove or put in the oven BEFORE THE MEAL (BTM), DURING THE MEAL (DTM), and AFTER THE MEAL (ATM). Dessert is considered after the meal to give time for some digestion! A PDF can be downloaded here.
A Simple Thanksgiving Timeline – Cooking on Thursday
A Simple Thanksgiving Timeline – Cooking Ahead Of Time
By the way, we recommend making things in advance! A Second Timeline is available here indicating a “make ahead” strategy.
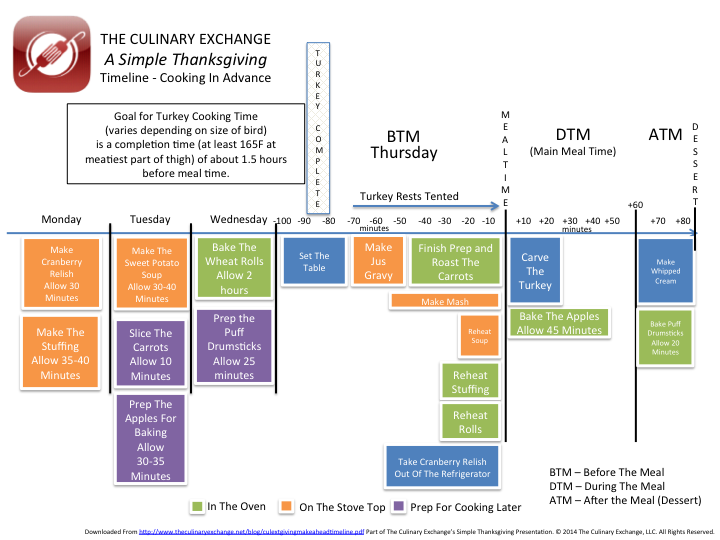
A Simple Thanksgiving Timeline – Cooking Ahead Of Time
As you will note, the turkey has to come out of the oven a lot earlier should you choose to cook the whole meal in one day. This is to allow time for other oven-needing items to be baked. There is a lot more flexibility when you prepare some items ahead of time.
Special Equipment
This meal is simple to create, but there are a few things that you might need to be aware of in terms of equipment. Here is a helpful list of equipment used in the recipes.
- An Instant Read Thermometer
- Roasting Pans
- Baking Trays
- A Small Grater
- A Paring Knife
- An Apple Corer
- A Potato Masher
- Fine Sieve
- A Whisk
- A Stick or Regular Blender
- A 4, 1.5, and 1 Inch Round Cookie Cutter
- A Hand Mixer
- A Slicing Knife
A Simple Thanksgiving Dinner Menu Recipes and Videos
Turkey and Jus Gravy
Yield – 1 Turkey
Overwhelmed by cooking a turkey? It’s not as difficult as you think. Here’s a simple guide to how to cook a turkey, along with some easy-to-follow tips and cheats.
Can You Make it Ahead? Yes! You can roast the turkey a day or 2 ahead and store it in the refrigerator wrapped tightly in plastic. The jus gravy can also be made ahead and reheated.
There will be no slathering of the bird with oil or butter! A dry skin will become a crisp skin. It may not be as brown, but it will be crisp. There is plenty of fat in the skin.
Will there be stuffing of the bird? It can be a food safety hazard, but it is easier to have the butcher do the trussing and cook the stuffing separate. If you do stuff, make sure the stuffing registers at least 165F on a thermometer.
Once the turkey has started roasting don’t open and close the door of the oven. This will just result in an oven that is not warm enough which will increase cooking time. This also means no basting! This is fine! No sense being tied to the oven. There are other things to be done. Let the oven do its work! Start opening the door of the oven to take the temperature of the bird about 30 before you think it will be done just to get an idea of how the bird is doing.
The turkey should roast until the temperature of the meatiest part of the thigh registers at least 165F. When inserting the thermometer, be careful not to touch the thigh bone with the thermometer.
For extra flavor in the Jus Gravy, simmer the broth with extra celery, carrot, onion, the giblets and any turkey bones you might have before adding the contents from the roasting pan.
TIP: Want to cheat? Purchase pieces of turkey instead of a whole turkey. They will roast faster and will be every bit as tasty. Plus, they will be easier to carve! Of course, you can always purchase an already cooked bird at the store.
Ingredients
For The Turkey
- 1 12-13 lb Whole Turkey cleaned and trussed by your butcher or you meat professional
- 1 sweet onion
- 1 celery stalk
- salt and pepper
- garlic powder
For The Jus Gravy
- 4-5 cups turkey, chicken or vegetable stock.
Directions
For The Turkey
- Preheat the oven to 325F. Place the turkey in a roasting pan. Pat the turkey dry with clean paper towels. Season with salt, pepper and garlic powder.
- Rough chop the celery and onion and add it to the bottom of the roasting pan.
- Put the turkey in the oven and close the door. Don’t open and close the door of the oven (see notes above). Start opening the door of the oven to take the temperature of the bird about 30 before you think it will be done just to get an idea of how the bird is doing.
- The turkey should roast until the temperature of the meatiest part of the thigh registers at least 165F. When inserting the thermometer, be careful not to touch the thigh bone with the thermometer.
- If the skin is getting over done, but more cooking is needed, simply place a piece of aluminum foil over the top of the bird.
- When the the meatiest part of the thigh registers at least 165F remove the turkey from the oven and let the bird rest at least 20 minutes.
For The Jus Gravy
- Strain and degrease the liquid at the bottom of the roasting pan.
- Add the liquid to enough hot turkey broth to double the amout of total liquid or to taste. Season with salt and pepper.
To Carve the Turkey (this is a good time to check out the video)
- Get your turkey platter ready! For simplest way to carve the turkey, remove the legs first.
- With a long slicing knife, make a slice at the lowest part of the breast. Then slice the meat from the breast downward.
- To remove the thighs, cut the thigh away from the breast. Find and cut the joint to remove the thigh.
- For the wings, pull the wings away from the body, find and cut the joint to remove it.
To Serve
- Serve the turkey hot or at room temperature with hot jus gravy.
Alternative Options
- Vegan/vegetarian option – Tofu! Use vegan broth.
- The dish is Dairy Free.
- This dish is Gluten Free.
Sweet Potato Soup with Spicy Pecans
Yield – 10-12 Cups of Sweet Potato Soup
Can You Make it Ahead? Yes! The soup can be made and stored in the refrigerator 2-3 days in advance or frozen 2-3 weeks in advance. When ready to serve, reheat the sweet potato soup and season to taste with salt and pepper, drizzle with cream and garnish with spicy pecans.
TIP: Want to cheat? Use canned pumpkin or sweet potatoes. This will save on the chopping. Just blend the pulp into canned stock (low sodium is best) and season to taste. Candied pecans can also be purchased and dusted with spicy chill powder.
Ingredients
For The Soup
- 1 large sweet onion
- 4 lbs of sweet potatoes
- 1 tsp of cinnamon
- 1/2 tsp nutmeg
- 1 tsp ground ginger
- 8 cups of turkey, chicken or vegetable broth
- cream for drizzling
- olive oil
- salt and pepper
For The Spicy Pecans
- 2 tbsp butter
- 1/4 lb pecan halves
- 2 tbsp dark brown sugar
- 1/tsp chili powder
Directions
For The Soup
- Dice the onion. Chop the sweet potatoes in large chunks.
- In a large pot heat 3 tbsp olive oil over medium heat. Add the onions and cook until they are soft.
- Add the sweet potatoes, cinnamon, nutmeg and ginger. Mix Well.
- Add the broth and mix well. Bring the pot to a simmer.
- Simmer the potatoes until they are soft.
- Using a stick blender, blend until smooth. If you do not have a stick blender, blend the soup in batches in a regular blender.
- For an extra smooth and luxurious soup, strain the soup through a fine sieve.
- Season to taste with salt and pepper
For The Spicy Pecans
- To make the spicy pecans, melt the butter in a medium saute pan over medium heat. When the butter is melted, add the brown sugar and chili powder.
- Mix well. Allow the sugar to melt into the butter then add the pecans.
- Continue to mix and toss the nuts so that the nuts don’t burn before the sugar comes to the hard crack stage.
- The sugar syrup will coat the pecans and become shiny. A good indicator that the nuts are done is when the sugar on the spoon used to stir the pecans begins to harden on the spoon between mixing.
- When the pecans are done, pour them onto a baking tray to cool.
To Serve
- Serve the soup hot in warmed bowls, seasoned to taste with salt and pepper. Warm the cream and drizzle on top of the soup. Garnish with spicy pecans.
Alternative Options
- Vegan/Vegetarian Option – Use Vegetable Broth. Replace Butter with Soy Margarine. Use Soy Cream for drizzling.
- This Soup is Gluten Free
- This soup can be made dairy free by omitting or replacing the cream with soy cream.
Roasted Carrots with Pomegranate
Yield – 4-5 Cups of Roasted Carrots
Can You Make it Ahead? Yes, but it is better to make the day of. The carrots can be cut ahead of time and stored in the refrigerator.
TIP: Want to cheat? Look for a frozen option. There are so many great choices in the frozen vegetable section now. They are great time and money savers. To give it an extra oomph, add some fresh herbs to taste.
Ingredients
- 4 lbs mixed colored carrots (regular orange will work fine)
- 1 pomegranate
- 1 orange
- 1 bunch of fresh oregano
- olive oil
- salt and pepper
Directions
- Preheat the oven to 350F.
- Peel and slice the carrots on the bias – into planks.
- Place the sliced carrots in a large bowl. Drizzle with olive oil. Add a nice pinch of fresh oregano. Season with salt and pepper.
- Roast the carrots in a roasting pan until they are fork tender. Check seasoning.
- Add the seeds of the pomegranate.
- Slice the orange in half and squeeze the juice of half the orange on to the carrots. Mix well.
- Serve hot or at room temperature.
Alternative Options
- This dish is Vegan, Vegetarian, Gluten Free, and Dairy Free.
Orange Cranberry Relish
Notes
Yield – About 2 Cups of Relish
Can You Make it Ahead? Absolutely Yes! Make the relish 2-3 days in advance to save time! Store it in the refrigerator in a plastic or glass bowl with a tight fitting lid.
TIP: Want to cheat? Purchase cranberry relish from the deli or used canned. The canned options are an easy, tasty and a great time saver.
Ingredients
- 3/4 lb fresh cranberries
- 1 cup of sugar
- 1 cup of fresh orange juice
- 1 orange
- 1 tsp of cinnamon
- 1/2 tsp of nutmeg
- 2 star anise
Directions
- Using a grater, zest the orange only removing the orange layer and not the white pith layer.
- In a medium pan, whisk the orange juice and sugar over medium heat.
- When the sugar disolves, add the spices. Whisk well.
- Bring the juice to a simmer. Add the cranberries and continue to simmer.
- As the mixture simmers the cranberries will pop and the sauce will thicken.
- When most of the cranberries have popped and the sauce is thick and reduced add the orange zest and stir well. Remove the sauce from the heat.
- Serve at room temperature.
Alternative Options
- This dish is Vegan, Vegetarian, Gluten Free, and Dairy Free.
Potato and Celery Root Mash
Notes
Yield – About 8-10 cups of Mash
Can You Make it Ahead? Not recommended! Make the mash the day of the meal. Plan on it taking about 25-30 minutes to make.
TIP: Want to cheat? At this time of year you can purchase anything, even a decent mash. There may not be a celery root option, but you can buy your mash already made. Of course, you can use instant potatoes and add some sautéed celery or celery root for a similar taste profile.
Ingredients
- 2 lbs of a creamy variety of potato
- A 2.5-3lb celery root bulb
- 1 cup of milk
- 4 tbsp of butter
- salt and pepper
Directions
- Peel and cube the potatoes. Peel and cube the celery root. Both the potatoes and celery root cubes should be roughly the same size.
- Bring a large pot of water to boil. When the water is boiling, add the celery root and potatoes.
- While the potatoes and celery root are cooking, warm the milk and butter in a small pot on low heat.
- When the potatoes and celery root are soft drain the water. Begin mashing!
- Moisten with the warm milk/butter mixture. Continue mashing to your desired texture. For extra smoothness, use a hand mixer.
- Season to taste with salt and pepper.
- Serve hot.
Alternative Options
- Vegan/vegetarian option – Substitute the milk with soy milk or vegetable broth. Use vegan or soy margarine.
- Low fat option – Use skim milk or broth. Omit the butter.
- Dairy Free Option – Omit the Butter and Milk.
- This dish is Gluten Free.
Ciabatta and Pork Stuffing
Notes
Yield – 1 – 9 inch bread pan! (Yes, this years stuffing is in a loaf form!)
For something slightly different (but still delicious), try this new spin on the traditional turkey stuffing. This recipe for stuffing is easy to make, and can even be made in advance.
Can You Make it Ahead? Absolutely Yes! If the stuffing is being made in advance, let it cool fully, cover with plastic wrap and refrigerate. The stuffing can be made 2-3 days in advance and stored in the refrigerator until the time of service.
TIP: Want to cheat? Purchase your favorite, already made croutons. Low salt varieties will be best. Already cooked or pre-seasoned sausage (instead of ground pork) will work just fine, too.
Ingredients
- 2 loaves of fresh ciabatta bread (enough to yield about 10-12 cups of bread cubes.)
- 1 lb lean ground pork
- 1 medium green apple
- 1 small fennel bulb
- 2 celery stalks
- 1 tsp fennel seed
- 1 medium sweet onion
- 2.5 cups of turkey, chicken or vegetable stock
- olive oil
- salt and pepper
Directions
- Cube the ciabatta into a medium dice. To do so, slice the bread vertically, then horizontally. Slice the bread into strips, then into cubes. This will yield about 10-12 cups of bread cubes.
- Peel (optional) and dice the apple Dice the fennel bulb. Dice the onion. Dice the celery.
- In a large bowl, toss the bread cubes in olive oil. Season with salt and pepper.
- In a large sautee pan, in batches, toss the bread cubes over medium heat until they are golden brown and crisp. You can also bake them in a 350F oven.
- When the cubes of bread are golden and crunchy, pout them on to a baking tray lined with paper towel.
- In a large pot, heat 3 tbsp olive oil over medium heat. Add onion , fennel, apple, and celery. Saute until tender.
- When the vegetables are tender, add the pork. Cook the pork thoroughly.
- Add the fennel seed.
- When the pork is cooked through, add the bread cubes.
- Mix well!
- Add stock a half cup at a time until the stuffing is just moist and binding together. Continue mixing to break up the bread cubes leaving some whole for texture.
- Scoop the stuffing into a non stick bread pan or a buttered baking dish. Pack the stuffing a little tight so it is bound together.
- When ready to serve, preheat the oven to 350F. Bake the stuffing for 30-35 minutes until it is hot.
- De pan the stuffing from the loaf pan and slice to serve.
- Serve Hot.
Alternative Options
- Vegan/vegetarian option – Omit the pork and substitute with well drained cubes tofu. Use vegan broth.
- The dish is Dairy Free
- Gluten Free option – Use gluten free bread.
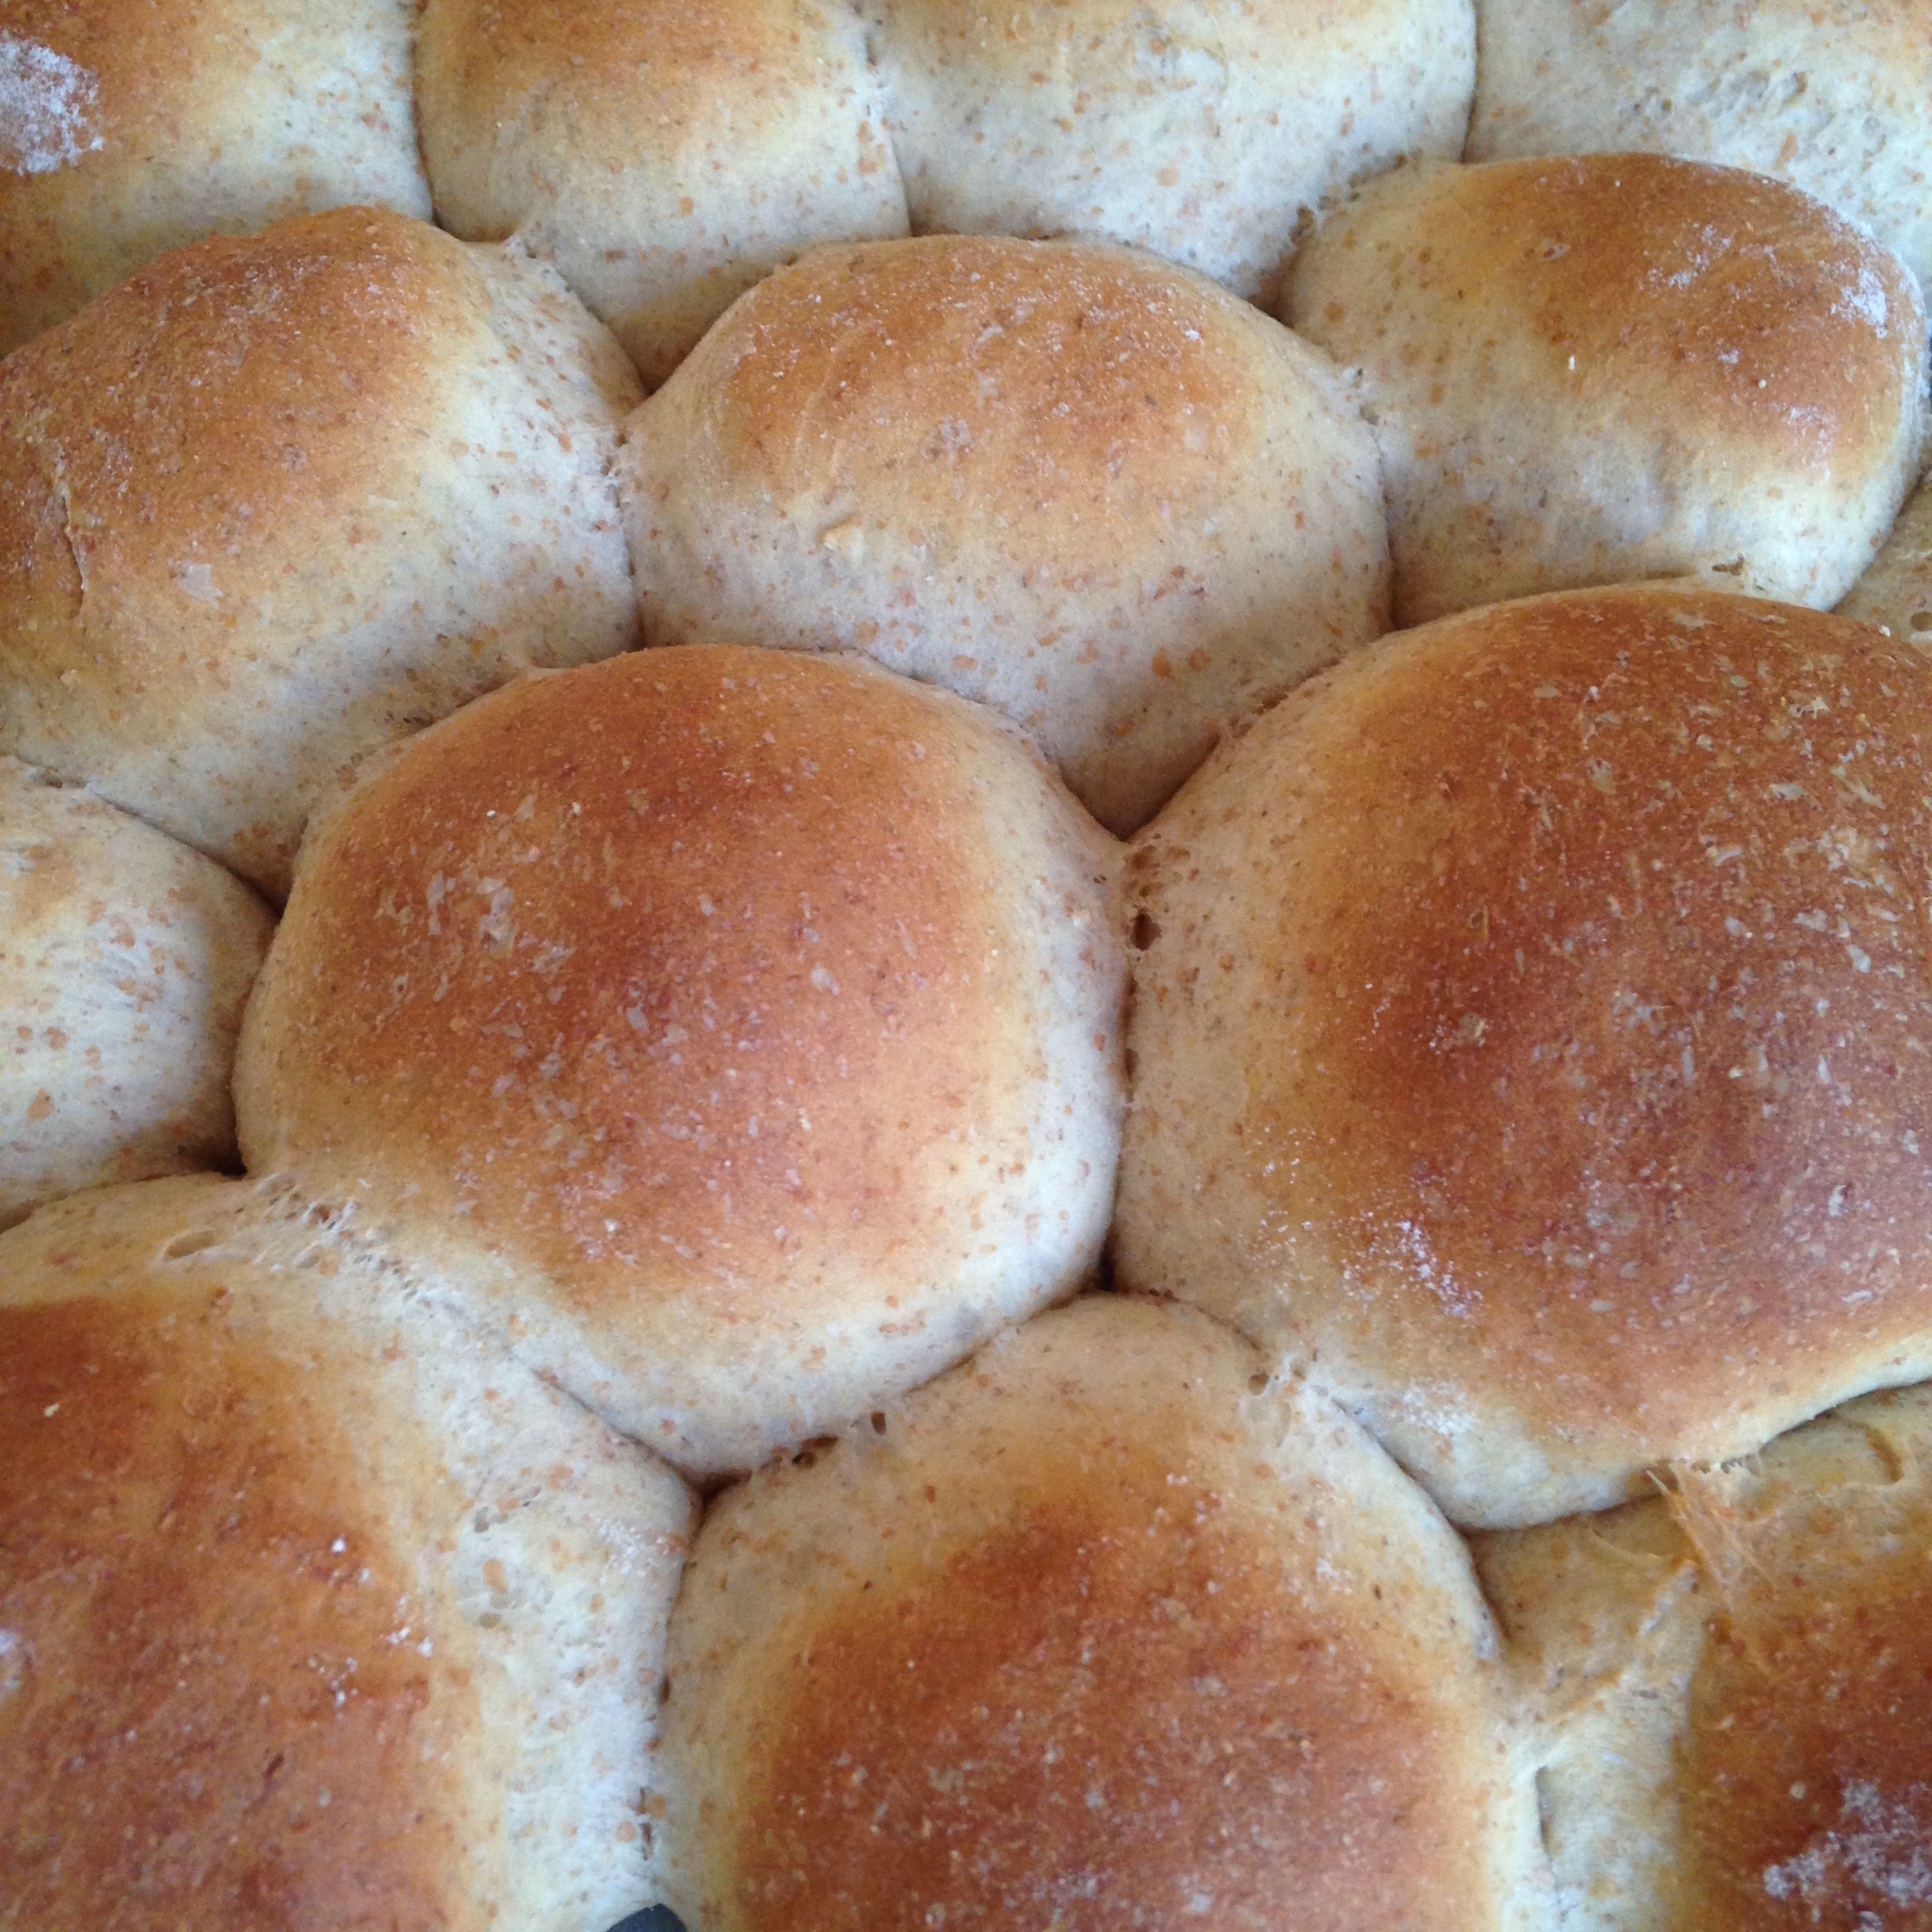
Wheat Rolls
Notes
Yield – About a dozen rolls.
Can You Make it Ahead? Absolutely Yes! You can bake the rolls a day or more in advance or make and freeze a week in advance.
TIP: Want to cheat? Purchase nice rolls from your favorite bakery or grocery store. We used our bread maker to save time!! It is a great time saver with so many other things to do! Plus, it does a lot of the work while you are doing something else. Getting 2 things done at once is fantastic!
Ingredients
- 1 cup of milk
- 1 egg
- 2 tbsp butter
- 2 tbsp of sugar
- 1 tsp yeast
- 2 cups of all purpose flour
- 1 cup of whole wheat flour
- 1.5 tsp of salt
Directions
- Place all the ingredients in the bread machine.
- Use the dough cycle.
- When the dough is done rising, punch it down.
- Shape into rolls. Place on a baking tray that has been sprayed with non stick spray.
- Let them rise again in a warm spot, covered with a towel.
- When they are doubled in volume bake at 350F about 20 minutes or until golden brown on top and hollow sounding when you tap them.
Alternative Options
- Vegan/vegetarian option – Substitute the milk and butter with soy equivalents. Omit the egg and add 2 tbsp vegetable oil.
- Dairy Free option – Substitute the milk with water.
- Gluten Free option – Swap the flour with your favorite gluten free flour.
Baked Apples with Puff Pastry Drumsticks and Amaretto Whipped Cream
Yield – 8 baked apples.
Can You Make it Ahead? Asbsolutely Yes! The apples can be prepared 1-2 days ahead, covered with plastic wrap and kept in the refrigerator. Bake them while you are eating dinner!
The puff pastry drumsticks can be made 1-2 days ahead and stored in the refrigerator
wrapped tightly with plastic wrap.
TIP: Want to cheat? Purchase shortbread cookies instead of using puff pastry. This will save on baking and prep time and be just as good. A can of whip cream can do the job here, too! Serve shots of amaretto to compensate for the missing Amaretto Whipped Cream.
Ingredients
For The Apples
- 8 baking apples like Jonagold
- 1/4 lb of dried apricots
- 1/4 cup of pecans
- 2 cups of demerera sugar
- 3 tsp of cinnamon
- 1/4 tsp nutmeg
- 1/2 tsp ground ginger
- 8 tbsp butter
For The Puff Pastry Drumsticks
- 2 10×15 sheets of frozen puff pastry
- 2 cups of demerera sugar
For The Amaretto Whipping Cream
- 1 cup go whipping cream
- 2 tbsp of amaretto
- 3 tbsp of powdered sugar
Directions
For The Apples
- Preheat the oven to 350F.
- Dice the apricots. Chop the pecans.
- Core the apples with a paring knife, apple corer and a spoon, being careful not to break through the bottom. (check out the video for this!)
- Mix the filling for the apples. In a large bowl combine 2 cups of sugar, apricots, pecans and spices.
Mix Well! - Place 1/2 tbsp of butter in each apple. Then fill each apple with the sugar mixture. Top the sugar with another 1/2 tbsp of butter.
- Place the apples in a baking pan. Sprinkle any extra sugar mixture on the apples and into the baking pan.
- Bake the apples for 35-40 minutes or until they yield to the touch and are baked through. A sauce will be create on the bottom of the pan. Spoon the sauce over the baked apples.
For The Puff Pastry Drumsticks
- Cut circles from cold puff pastry using cookie cutters – 4 inch, 1 .5 inch and 1 inch circle. 8 of each size are needed. Stack the circles going up from largest to smallest.
- Place them on a baking tray sprayed with non stick spray. Sprinkle liberally with demerera sugar.
- Bake in a preheated oven at 400F until puffed and golden brown.
For The Amaretto Whipping Cream
- In a large bowl, mix the whipped cream, amaretto and powdered sugar.
- Whip the cream with a whisk or a hand mixer until stiff peaks form.
To Serve
- Serve the apples warm with a puff pastry drumstick and a dollop of amaretto whipped cream.
- Drizzle the apples with more sauce from the pan in which the apple were roasted!
Alternative Options
- Vegan/vegetarian option – Substitute the whipping cream and butter with soy equivalents. A vegan/vegetarian puff pastry can be used as a substitute. If this is not available, vegan shortbread cookies or pie crust could be substituted.
- Dairy Free option – Substitute the whipping cream and butter with soy equivalents.
- Gluten Free option – A gluten free puff pastry is needed. If this is not available, gluten free shortbread cookies or pie crust could be substituted.
The Wine
Notes
Drinks are an important part of the feast. We recommend having 2-3 bottles for the main meal and 1-2 bottles for dessert.
Remember, a good bottle of wine can be had for under 8 dollars. Ask your wine professional for help with finding a good wine for the money!
We make a recommendation for wine, but you should also drink what you like!
Our recommendation:
| Main Meal | Dessert |
|---|---|
| Pino Gris | Muscat De Beaumes – De – Venise |
The Place Settings
How the table looks is every bit as important as the meal. It is nice to see a table set with lots of utensils. It means that there is a lot of great food coming. Here is a suggested table setting plan for the dishes and drinks that will be served at this Simple Thanksgiving. Not shown is the dessert plate. It is served after the plates of the main meal are removed. A copy of the plan can be downloaded here.
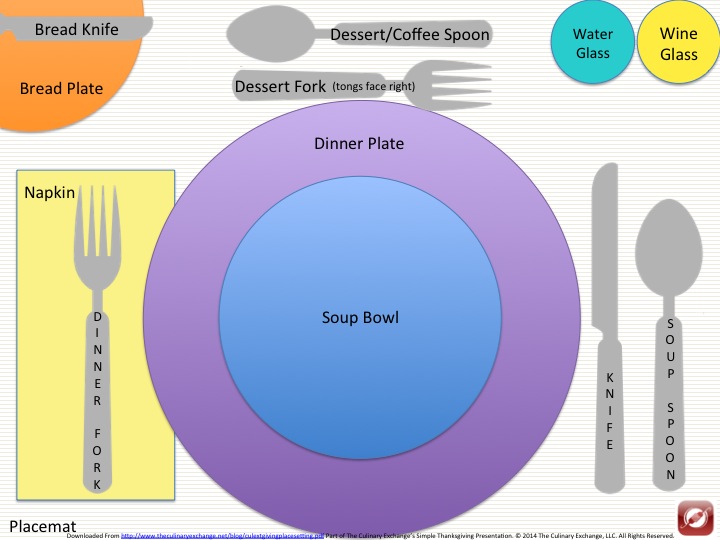
A Suggested Place Setting Plan for A Simple Thanksgiving
Happy Thanksgiving!
Thoughts or Questions About This Plan? Let us know in the comments or on Facebook.
The Culinary Exchange can also be found on Twitter, Instagram, Pinterest, Google+ and YouTube.